- Install Oracle 11 g Client from here- http://www.oracle.com/technetwork/database/enterprise-edition/downloads/112010-win32soft-098987.html

- Install Admin Tool
- Setup System
DSN in ODBC Data Source Administrator. Add and configure your server like
below.

- Go to
the following location(C:\Oracle Business Intelligence Enterprise Edition Plus
Client\oraclebi\orahome\bifoundation\server\bin or as the Admin tool in
installed on your machine) and edit bi_init
file. In my case, bi_init looks like
this

- Make sure you have tnsnames.ora file and you have the database connection set accordingly like this where eicfdcn49.ebiz.verizon.com is the database server. QD1=(DESCRIPTION=(ADDRESS=(PROTOCOL=TCP)(HOST=eicfdcn49.ebiz.verizon.com)(PORT=1521))(CONNECT_DATA=(SERVER=DEDICATED)(SERVICE_NAME=QD1)))
- Place your
tnsnames.ora file in Oracle folder or any appropriate folder and set PATH and TNS_ADMIN variables to its location as below in User Environment variables.
 7. Now try to import a table in the Admin tool like below
 Where rmi_read is the database user in my case.
Thursday, June 27, 2013
OBIEE 11g Connection Admin Tool to OBIEE Server Located Remotely


Thursday, June 20, 2013
How to Enable Essbase menu in Excel (Essbase 11.1.2.2)
- First we need to check whether provider services are installed or not.
- Then go to excel smart view options > advanced > shared connections url. Here we need to enter the Smart View Provider URL -

- And then we need to go in excel smart view > Panel. As shown below

- In the smart view panel select ‘Shared connections > enter the credentials

- Now in smart view panel select ‘Private Connections > Create new connection (at the bottom).

- The option shows as ‘Smart view http provider’ click on it and then enters URL as http:// <server>: port /aps/SmartViewProvider and makes it as default connection.

- Click next and then connect to the data source of Essbase cluster as shown.

- And then select which application to be loaded.

- After the connection is set up double click on the particular application we can see Essbase option beside Smart view in Menu bar of Excel.
Settings to be made in Internet Explorer after Installing EPM 11.1.2.2.0 (Post Installation Steps EPM 11.1.2.2.0)
- After installing Essbase client and planning check whether “Workspace” is opening or not.
- Essbase 11.1.2.2 supports only IE8, IE9. We may get error if we are using IE 10.
- Once after it is sure that the version of IE is compatible then disable the Compatibility view and do modifications in “Internet Options” as shown below.
- Configure browser to check for new version every time user visits a page:
ii. Go to Tools->Internet Options-> General


iii. In “Browsing History” section click on “Settings” button and then select “Every time I visit the webpage” option.
iv. Click OK, then Apply.
Disable default pop-up blocking.
ii. Go to Tools-> Internet options-> Privacy tab

c. Uncheck the option “Turn on Pop-up Blocker”.
- Add Workspace URL to trusted sites
ii. Go to Tools-> Internet options-> Security tab

iii. Select “Trusted sites” from “Select a zone to view or change security settings” window, then click on “Sites” button.

iv. Type your workspace URL in form http://workspaceserver:portnumber in “Add this website to the zone”.
v. Uncheck “Required server verification (https:) for all sites in this zone”.
vi. Click Add, the Close.
vii. Click OK and Apply.
- Minimize security settings for trusted sites
i. Open Internet Explorer
ii. Go to Tools-> Internet options-> Security tab
iii. Select “Trusted sites” from “Select a zone to view or change security settings” window.

iv. From “Reset to:” list select “Low”

v. Click OK.
vi. Click Apply, then OK
- Customize Security settings
ii. Go to Tools-> Internet Options-> Security Tab.
iii. Select zone containing your Oracle Hyperion servers and click on “Custom level...” button.
iv. In “Miscellaneous” section enable options “Access data sources across domains” and “Allow script-initiated windows without size or position constraints”.
v. In “ActiveX controls and plug-ins” section enable “Run ActiveX controls and plug-ins” and “Script ActiveX controls marked safe for scripting”.
- Enable option “Always allow session cookies”.
i. Open internet Explorer.
ii. Go to Tools-> Internet Options-> Privacy Tab-> Advanced. Check the “Override automatic cookie handling”, accept the first and third party cookies and check the “Always allow session”

- Only for SSL enabled environments: Disable option “Do not save Encrypted pages to Disk”.
ii. Go to Tools->Internet options-> Advanced tab. In “Security” section uncheck the option “Do not save Encrypted Pages to Disk”.
- Disable option “Enable Native XMLHTTP”.
Go to IE->Tools->Internet options-> Advanced Tab. In “Security” section uncheck the option “Enable Native XMLHTTP”.
Disabling Compatibility Mode in Internet Explorer:
- The first main setting is to disable compatibility mode in Internet Explorer. This applies for both IE8 and IE9, though the steps are a slight bit different.
- To make this harder - IE comes with a not well known default setting that automatically enables compatibility mode for intranet sites - where Hyperion typically resides. Looking carefully at the dialog box below see the option by default "Display intranet sites in Compatibility View". This should be unchecked for Hyperion!
- Hyperion will not work in Compatibility Mode.
- Under Internet Explorer:

Tuesday, June 4, 2013
Creating Time Series Measures
Steps to
create Time series Measures
1)
Identify
a time dimension and chronological keys.
2)
Create
a measure by using the AGO function.
3)
Use
a column with the AGO function to create additional measures
4) Add new measures to the Presentation Layer.
4) Add new measures to the Presentation Layer.
5)
Test
the result.
Identify a
logical dimension as a Time dimension.
1)
Open a
repository in offline mode. In the BMM layer,
double-click the H1 Time logical dimension to open the Logical
Dimension dialog box.
2)
In the Structure section, select Time.

Identify level key as a chronological keys.
1)
Expand the H1 Time logical dimension
and double-click the Time Detail level to open the Logical Level dialog
box.
2)
Click the Keys tab.
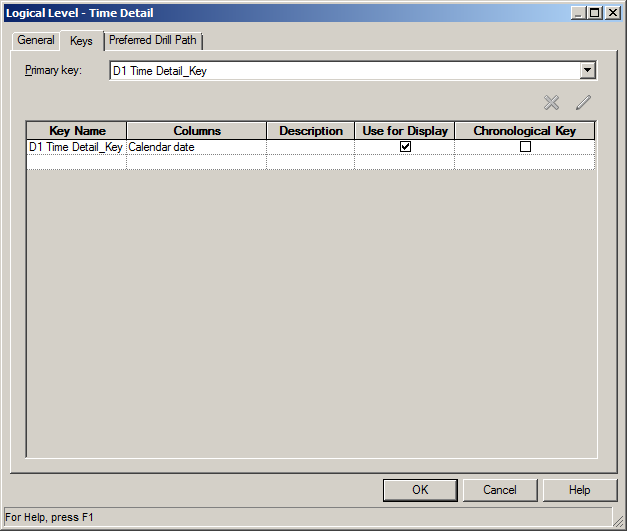
1) Select chronological key check box..

2) create Measures on Ago function
Right-click the F1 Revenue logical table and select New Object > Logical Column.
On the General tab, name the column Month Ago Revenue.

3) On the Column Source tab, select "Derived from existing columns using an expression."

4) Open the Expression Builder.
5) Select Functions > Time Series Functions > Ago.

6) Double-click Ago or click Insert selected item to add the Ago function to the Expression Builder.
7) Click <<Measure>>in the expression.
8) Select Logical Tables > F1 Revenue and then double-click Revenue to add it to the expression.
9) Click <<Level>> in the expression.
10) Select Time Dimensions > H1 Time and then double-click Month to add it to the expression.

11) Click OK to close the Expression Builder. Check your work in the Logical Column dialog box:

12) Click OK to close the Logical Column dialog box. The Month Ago Revenue time series measure is added to the F1 Revenue logical table.

13) Drag the Month Ago Revenue logical column to the Base Facts presentation folder.

14) Use Fusion Middleware Control to load the repository.
15) Create Analysis by using Month ago Revenue logical column.
16) Test the result.
Subscribe to:
Posts (Atom)